TravelJapanBlog.com - Japan (07, 09-10, 13), Denmark (08, 11, 16-19, 21, 24), Korea (13), Poland (21), Mexico (14, 15, 19, 26), Iceland (17, 19), Hawaii (14, 17, 22), Czech Republic (16, 17, 19, 21)
The above will search Traveljapanblog.com.
Concerts - Landscapes - Sports


Posts tagged photography

Caselogic SLRC-205 SLR Camera Sling Bag Backpack

One of the main reasons it took me so long to purchase a DSLR was the size and weight factor of these beasts. Not only are they not fun to carry around, they make you stand out and look like a tourist. My first bike ride with my new Nikon, a mere two miles, was miserable. I used the camera bag that came with the camera, not a bad bag, but not what you want to have over your shoulder on a bike ride or a hike. So I did some research and came to the conclusion that I needed a “sling bag.” A sling bag is like a backpack, except that you don’t have to take it off to get the contents out. Based on the reviews of others, I came to the conclusion that many are not waterproof, not easy to use, fall apart, or have no space for a tripod. The one that consistently got good reviews on these four issues, and could be had for well under $100, was the Case Logic SLRC-205 SLR Camera Sling Bag. I made the purchase and have been using mine for over a week now.

So far the bag has exceeded my expectations. The rotation of the bag works smoothly. I can have my camera out in just seconds.

The SLR suspension system in the main compartment works great. It suspends the camera in the pouch so the camera lens isn’t touching the bag. You don’t even have to put the lens cap back on the camera since the lens isn’t touching anything in the compartment. This allows for even quicker shots. Alternatively, you can take the SLR suspension fabric out (via the velcro fasterner holding it in place), leave the lens hood on, and insert the camera. The SLR suspension does not work with a lens hood. I was happy to see that my D7000 with 18-200mm lens still fits (barely) with the lens hood.

I haven’t tested the sling bag in wet conditions yet, but it seems like it will do just fine. My new tripod easily attaches to the exterior, and the bag can still be slung around with the tripod attached.

This past weekend I went on a 20-mile bike ride with the sling bag and discovered another use of the straps for the tripod. The day started out in the low 50s so I had a jacket on. Halfway through my ride the temperature was in the upper 60s, and I wanted to remove my jacket. I didn’t have my tripod on the bag on the ride so I used the external straps to secure my jacket to it. It worked great. Taking off my jacket was the only time during my entire ride (which included over 200 pictures) in which I took the sling bag off!

There is another, newer model (308) of this bag which appears to have more space for storage. Personally, I’m glad I went with the 205 as it has all the space I will need on most outings and is less than half the weight of the DCB-308.

There is a compartment in the 205 that can be used for an extra lens (or lunch or water bottle if you don’t have another lens like me), another for lens caps and/or filters and/or SD cards, and another that can also be used for such things although I have found it handy thus far for storing my keys. There are also handles in just the right places to sling the camera to your front side or sling it back to the best position on your back.

Check out this video for more.

Finally, one of the things I like best, is that you don’t look like a tourist with this sling bag. Others won’t even know that you have a camera on you until you take it out. The sling bag looks (and feels) like a mini-backpack, not a bulky camera bag or full-blown backpack. You no longer need to have your DSLR tied around your neck like an anchor.

Macro shooting with Nikon D7000 18-200mm VR II lens

桜

Today’s photo wasn’t taken in Japan. I took it last week on the SOU campus. It’s one of the few cherry trees in Oregon that look like the sakura so common in Japan.

I don’t have a macro lens for my Nikon D7000. The camera with the 18-200mm lens simply won’t focus on anything closer than half a meter (1.6 feet) from the lens. I thought this would be problematic in taking these kinds of macro shots. That has not been a problem though. Instead of going inches from the target and taking the photo at or near 18mm, I just back up and zoom. This photo was taken hand held with a breeze blowing at 150mm. Not a bad macro, close-up shot for a non-macro lens like this…

Nikon D7000 DSLR Camera with 18-200mm VR II lens update

Given how my prior post discussing my new Nikon D7000 DSLR with 18-200mm VR II lens has quickly become the most popular page on the blog (in terms of hits), I thought I’d give a brief update to that entry.

The first thing is that I really, really love my new Nikon D7000 with the 18-200 mm lens. Even though it is so much bigger and heavier than my old cameras, I take it with me instead of my far lighter Panasonic alternatives. I feel like I don’t want to trade the weight/size/inconvenience for the quality of even a single shot.

The second thing is the vastly improved possibilities with respect to sports photography. Granted, the conditions in the above photo were ideal with lots of sun and blue sky, but still, I couldn’t have captured the ball and players so frozen and in so much detail with my other cameras in these conditions. Not even close. Also, firing off half a dozen shots in a second allows me to capture the perfect still instead of a picture that is a second too early or too late.

The third thing is the detail and lack of noise in photos is so far beyond what I’m used to. Check out this photo on my other blog. I have taken dozens of similar shots from my home over the years with other cameras. The best ones don’t have this kind of detail. Most require some noise reduction in Photoshop and/or Corel’s Paint Shop Pro. The noise reduction makes the detail even worse. I didn’t do any noise reduction to this image taken with the Nikon D7000.

The final thing to point out is with respect to my earlier comment on getting the 18-105mm lens instead of the 18-200mm lens. I take that comment back. If you can afford it, definitely get the 18-200 instead of the 18-105. Although the lens is bigger and heavier, I’ve found myself using that extra 95mm on so many shots. The difference is almost 2X which is more than a little difference as I erroneously said before. Changing lenses would be a huge hassle (and cause missed shots) so I’m very glad with my choice to go with a lens capable of a wide range than two lenses with narrower ranges like I was initially considering.

New camera – Nikon D7000 DSLR Camera with 18-200mm VR II lens

After 4 days of research and deliberations I purchased a new camera today. That’s my new baby up there.

I went with the Nikon D7000 digital SLR Camera with AF-S DX NIKKOR 18-200mm f/3.5-5.6G ED VR II lens. It also came packaged with an SD card, bag, and a few other goodies. Costco had them for $250 off until tomorrow. I’m glad I went and made my purchase today though as their online store sold out today and many of the stores have sold out as well. Amazon has a similar deal with even more extras for about $1,200 here.

As this is my first DSLR I can’t really compare it fairly. All I can say is wow! Maybe I’d say the same with an entry level DSLR, but this thing really smokes. We had poor weather today, but my test shots still came out great. Normally I have to really work hard to get a shot right, but with the D7000 it seems to just do everything perfect for you. The auto focus is so good and so fast. It blew me away.

The feel and sound is so nice. My P&S cameras now seem so cheap and error prone. That said, size and weight wise the D7000 is a beast. Lugging it around all day does not seem like it will be fun for long.

I’ll post some comparison shots and other feedback once I’ve messed around with it a bit more. For now, photos on this blog will still be with my old cameras. Photos with the D7000 won’t appear here until my European adventures this summer. I will soon start posting photos on my other blog with the D7000 though.

Panasonic Lumix TZ10 (DSC-ZS7 compared to ZS3)

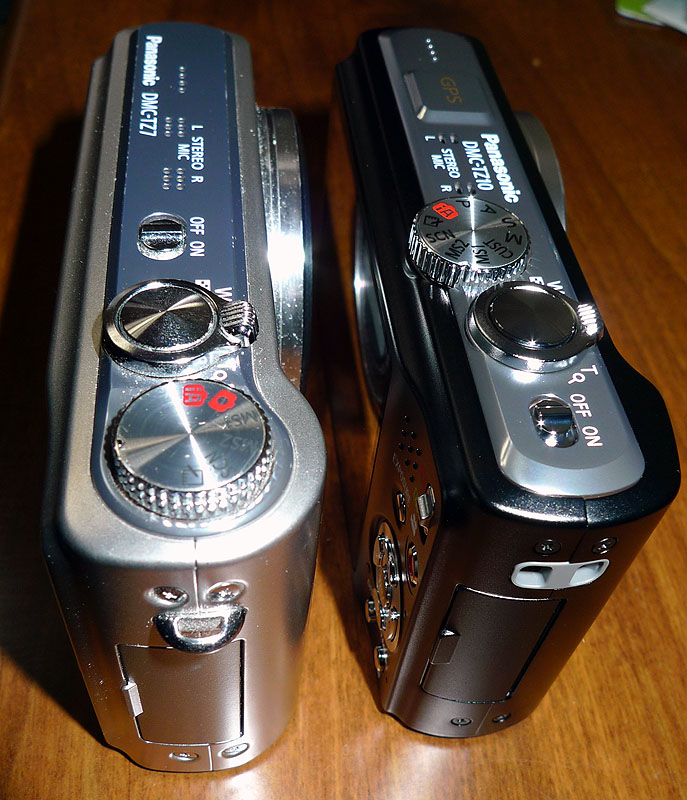
I walked into Yodobashi Camera in Shinjuku to try out the new Panasonic Lumix DSC-TZ10 (DSC-ZS7 in the USA). I brought my DSC-TZ7 along for comparison purposes.

The size and weight are the same or nearly so.

パナソニック dsc-tz10

The look is basically the same. Notice the manual controls that were absent on the TZ7. (P A S M on the dial of the TZ10 only.) On the TZ10 you have complete control of exposure length and many other features that were absent on the TZ7.

panasonic zs7

I like how the TZ10 dropped the metal strap holder that protruded off of the TZ7. I felt that little piece of metal more than once in my pocket. It was also an inconvenience when I took night photos if I wanted to place the camera next to pole or on its end for less shake.

tz10 zs7 tz7 zs5

The sales guy was most excited by the 超解像技術 which isn’t on the TZ7. I believe they are calling this “Intelligent Resolution Technology” in English. Basically, images are supposed to be much more crisp, especially when zoomed. Also, the dreaded whited-out-sky look on sunny days should be reduced with this feature.

I was able to compare the zoom of both cameras side by side. The TZ10 has more zoom, frequently a lot more zoom even though they are both advertised as 12x zoom. The TZ7 gets more than that in EZ mode. The TZ10 does even better. Depending on the settings your zoom will vary, but the TZ10 generally will get you about 30% more than the TZ7.

Panasonic has come up with a new, Power O.I.S. instead of just Mega O.I.S. This is supposed to make night photography or photography in low light much better. This is what the website says:

Just about everyone has had the experience of taking a photo at night and hoping to capture all the memories and beauty, only to be disappointed at the poor result. The POWER O.I.S. (Optical Image Stabilizer) nearly doubles the hand-shake correction power of conventional MEGA O.I.S. You get bright photos without blurring even from handheld shooting at slow shutter speeds.

Panasonic’s accumulated optical technologies, the MEGA O.I.S. has been incorporated into LUMIX from the early stage of digital camera development. This helped show all digital camera users the absolute need for hand-shake compensation, and led to its prevalence throughout the industry. And now, Panasonic has worked on the low-frequency vibration hand-shake component, which is physically generated when pressing the shutter button or when shooting at night with a slow shutter speed.

night pictures blurry how to fix
TZ10 ls7

Nice, right? I’ve done a few tests; the hand-held shots, leaving the shutter open for 1/2 second, are better, but don’t expect miracles. If possible, you’ll still want to rest your camera on a surface or tripod for night photography.

The TZ10 offers 20% more megapixels.

The TZ10 also has a GPS. The GPS wasn’t a big selling point for me as I don’t upload my photos to sites like Picasa. However, I think it may come in handy while traveling or hiking if I get lost. I’ve noticed already that it provides the name (in addition to coordinates) of the closest shrine, temple, train station, etc. in Japan. This information is good to know if you happen upon a place and don’t know what it is called in English (because you can’t read the kanji).

There are other improvements in the TZ10 when compared to the TZ7 as well like saving you over a second from the time you turn the camera on to when you can take the first picture, happy mode, adjustable vibrance, and a longer lasting battery.

So I purchased the TZ10 (ZS7). Would I recommend it? If you are on a tight budget, the TZ7 (ZS3) is fine if it is more than $100 cheaper than the TZ10. If you can afford it, and/or the TZ10 isn’t more than $100 more than the TZ7, then I would suggest the TZ10 is worth it for the above features, especially if you need the added zoom or plan to take pictures in low light.

Panasonic Lumix DMC-LX3 versus TZ7 (ZS3 in the U.S.)

I’m going to interrupt the normal daily post about Japan for one about cameras. Until February of 2009 nearly all of the pics on this blog were taken with my old Canon S3. A few had been captured with a crappy, little Kodak camera that was my daughter’s that I used in a pinch or when I didn’t want to carry the large S3 around. I loved that S3 camera, but its time had come. I sold it soon thereafter and have been using only the LX3 since (although many older pictures that I have posted on the blog since February were taken with the S3).

The LX3 takes great pictures, and I love the wide angle lens (24 mm), but a few things about it bug me. The cap is a hassle to take on and off manually for every time a picture is taken. Although not nearly as big and heavy as the S3 was, it still isn’t a camera I like to have in my pocket the entire day. But most of all, the 2.5x maximum zoom came to be a problem in a number of situations. 60 mm is simply not enough to photograph sports or to get some good people shots without the subject knowing you are photographing them.

Now let me introduce you to my latest purchase, the TZ7 (sold as the DMC-ZS3 in parts of the world including the USA). The TZ7 doesn’t take as high of quality of pictures in low light or indoors, the wide angle isn’t quite as wide (25mm instead of 24mm), and you can’t control your shots (setting exposure length, etc.) quite as much. But there are many reasons to possibly opt for the TZ7/ZS3 over the LX3. It weighs 229 grams instead of the LX3’s 265 grams. 36 grams may not sound like much, but the 16% lighter factor can be felt immediately. After a day of it in your pocket you’ll notice the difference even more.

panasonic dmc-lx3
panasonic dmc-tz7 dmc-zs3

The published dimensions for these two cameras are incorrect. One of the main reasons I purchased the LX3 was because of the dimensions I read on the internet. They are false. From back to front the LX3 is supposed to be only 27.1 mm. My measurements give a reading of 46 mm, and that is before taking the lens cap off and turning the camera on. The TZ7 has a published depth of 32.8 mm. My reading gives only 28 mm. In other words, the TZ7 is barely more than half as thick (due to the LX3’s protruding lens). This makes a huge difference in your pocket if you are carrying it around all day. The heights are the same and the TZ7’s width is a little more than 5 mm smaller. So, for portability, the TZ7 is much better.

The TZ7 takes much better video in most conditions. The LX3 can take great video too, but you can’t zoom in and out when recording video on the LX3. I’ll show you some sample videos with the TZ7 soon.

The TZ7 can cost anywhere from $100 to $200 less than the LX3 (assuming you can even find the LX3 in stock).

But the biggest reason why I purchased the TZ7 was not the lens cap annoyance, the better price, the better video, or the improved portability, it was the zoom. The TZ7 has 12x zoom. Cropping can only yield so much with the LX3, and I found myself cropping nearly everything I took with the LX3. Now I can zoom to 300mm and not be stuck at 60mm and a large crop.

I don’t plan on selling my LX3. I’ll use it for sunsets (and other low-light conditions), indoor pictures, and in some other situations where it may result in a substantially better picture. But given the portability and the zoom possibilities with the TZ7 I think it will be brought along more often. Have I completely sold you on the TZ7 over the LX3? I hope not, as my initial testing and photo comparisons indicate that the quality of pictures is generally better with the LX3. I’ll show you my first set of tests in my next entry.

Another reason I purchased the TZ7 is we only had one camera in Japan. My kids are going to Cambodia and Miyajima on field trips during the same week. Sending only one of them off with a camera didn’t sound so hot to me.